Showing posts with label Through Walks. Show all posts

Thursday, 14 July 2011

Cunningham's Gap to Hole in the Wall

Laidley Valley & Mt. Castle
Date: 9 July - 10 July 2011

Walkers: Myself

Notes:
Day 1 
I wanted to get off track for a change after not having done anything like this since our Lost World walk last year. So after getting ideas from my trusty Take a Walk book I decided on Cunningham’s Gap on the Main Range as my starting point. I would follow the range North as far as I could in a day and at that stage the idea was to head back the way I’d come. As usual though, things didn’t all go according to plan.

The forecast for the weekend was COLD. BOM was predicting negative temperatures for Ipswich and that is what we awoke to on Saturday morning. The temperature gauge hanging from the car read just above -4 when I wiped the ice off it at 5AM. We set off soon after and after watching the sun rise on our way we arrived at Aratula for breakfast just after 6. Another 45 minutes and we were at the car park on top of the range and I managed to get going just before 7.

Sunrise over the Moogerah Peaks
The first section of the route was via the Mt. Cordeau and Bare Rock marked track and I covered this first 6KM within an hour and a half. From this point the pace slowed significantly as the track all but disappeared. The track notes were fairly vague and I found the small details they did give not very useful as it was hard to gauge distance covered or to find some of the landmarks mentioned.

Is there a track in there?
Climbing Vine
Large trees and crows nests were the highlight from this section
My general advice would be to keep track of the edge of the Eastern escarpment and not to stray too far from it in most cases. Sometimes foot pads could be found on the narrower ridges which was a godsend. However, as soon as you found one and got up some speed there would be a tree fall and it would disappear amongst the vines and foliage brought down from the tops.

The one feature that was hard to miss was the rocky spring fed creek. Despite earlier creek’s being dry this one still had a reasonable trickle so I filled up an extra litre of water here. There weren’t any obvious spots for lunch and in the end I left it too late to stop; I felt the effects of this throughout the afternoon. 

After slogging up the final two or three peaks of the ridge I eventually made it to Sylvesters lookout by about 3 in the afternoon. I collapsed here for about half an hour before convincing myself to get up otherwise I wasn’t going to make it to camp before dark. The track leading to Laidley Ck. Falls and Hole in the Wall left from just before the lookout platform and was a much more defined foot pad than the previous section.

After descending slightly to a rocky gully the track rose steeply until it came to an obvious junction where an off shoot headed off to the right to the old Sylvesters Lookout. Despite the track notes describing the views as poor I thought it was well worth the small detour. The views back down the range were spectacular.


Once I rejoined the main track there was some more uphill before finally reaching the top of the ridge and subsequently descending all the way down the other side. This section travelled through some less dense eucalypt forest with shoulder high ferns often hiding the track in front of me. Once again my advice here is to keep closer to the escarpment than not. There was a large tree fall that blocked what looked like it used to be the track heading more directly down the ridge. After one more knee crushing muddy down-hill section I finally reached the camp site just before 5 and just in time to set up camp before dark.

Large gum trees surviving on an exposed ridge
This section of the ridge was exposed to the strong Westerly
Day 2
My campsite at Laidley Ck. Falls
Overnight, the temperature didn’t reach the minimum’s that had been predicted by the bureau. Instead it only reached about 4 degrees. The wind did change direction at one point but overall the campsite was well protected from the 50km/h Westerly’s I’d experienced the day before (yes this was my first trip using my little Brunton weather station).

After my experiences of day 1 I decided that if possible I’d much rather not do the section from Bare Rock to Sylvesters lookout again. Luckily there was plenty of phone reception and I was able to organize my pickup to detour to Goomburra Valley instead of the gap and I would try to be back at the lookout by around 1PM.

I still hoped to get out to Hole in the Wall before heading back to the lookout so I followed the notes advice and headed North-West from the campsite on one of the obvious foot pads heading out of the campsite. I soon found Laidley Creek which had a very small trickle of water flowing. There were numerous foot pads in this area and it soon became quite confusing which one was the correct one. I eventually ended up at the cliff face at the top of the falls looking out towards the valley and Mt. Castle. It was obvious that this wasn’t the route described in the notes and I was running out of time so decided to just head for the main ridge and see what the not-so-recommended direct route was like.

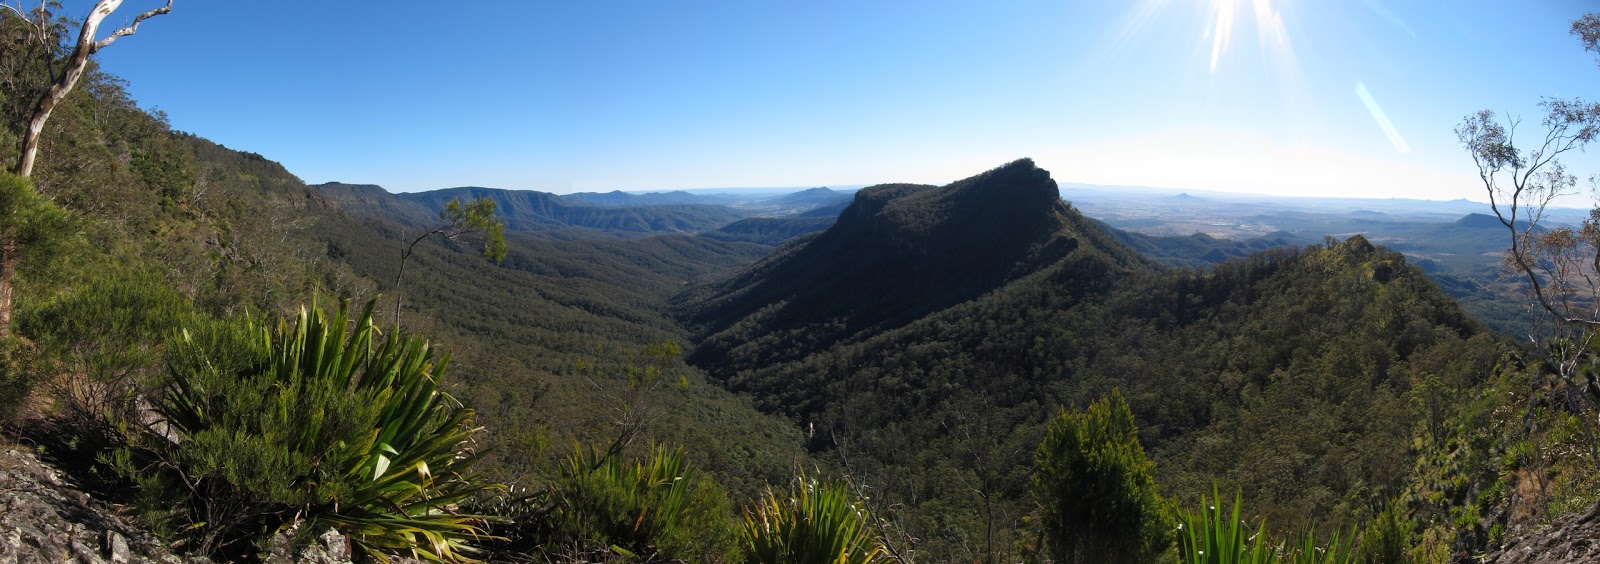
I reached the tip of the main ridge quickly where I was greeted with amazing views down the Laidley Valley, across to Mt. Castle, out over the Moogerah Peaks and back along the Main Range. The track continued to the edge of a drop off which after closer inspection proved to be the way down. There was an indentation in the small cliff line with plenty of foot and hand holds. An obvious foot pad then continued through a small patch of trees before reaching another small drop off negotiated by down climbing a wide crack.

View back down the range and towards Moogerah Peaks & Mt. Barney
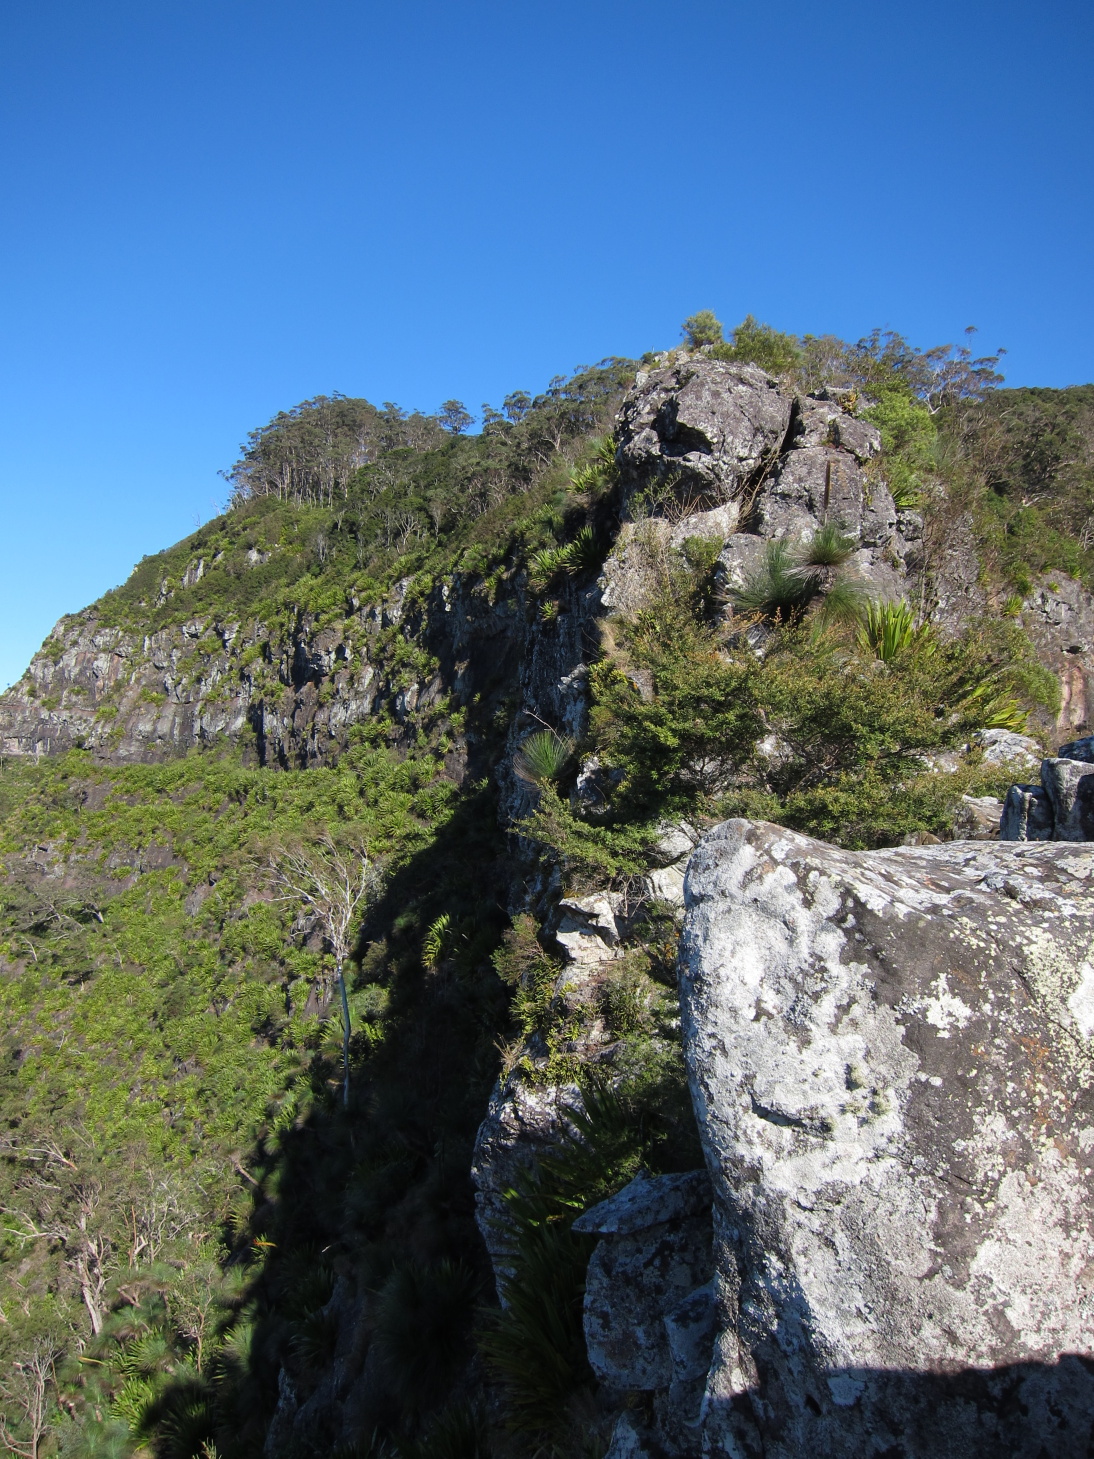
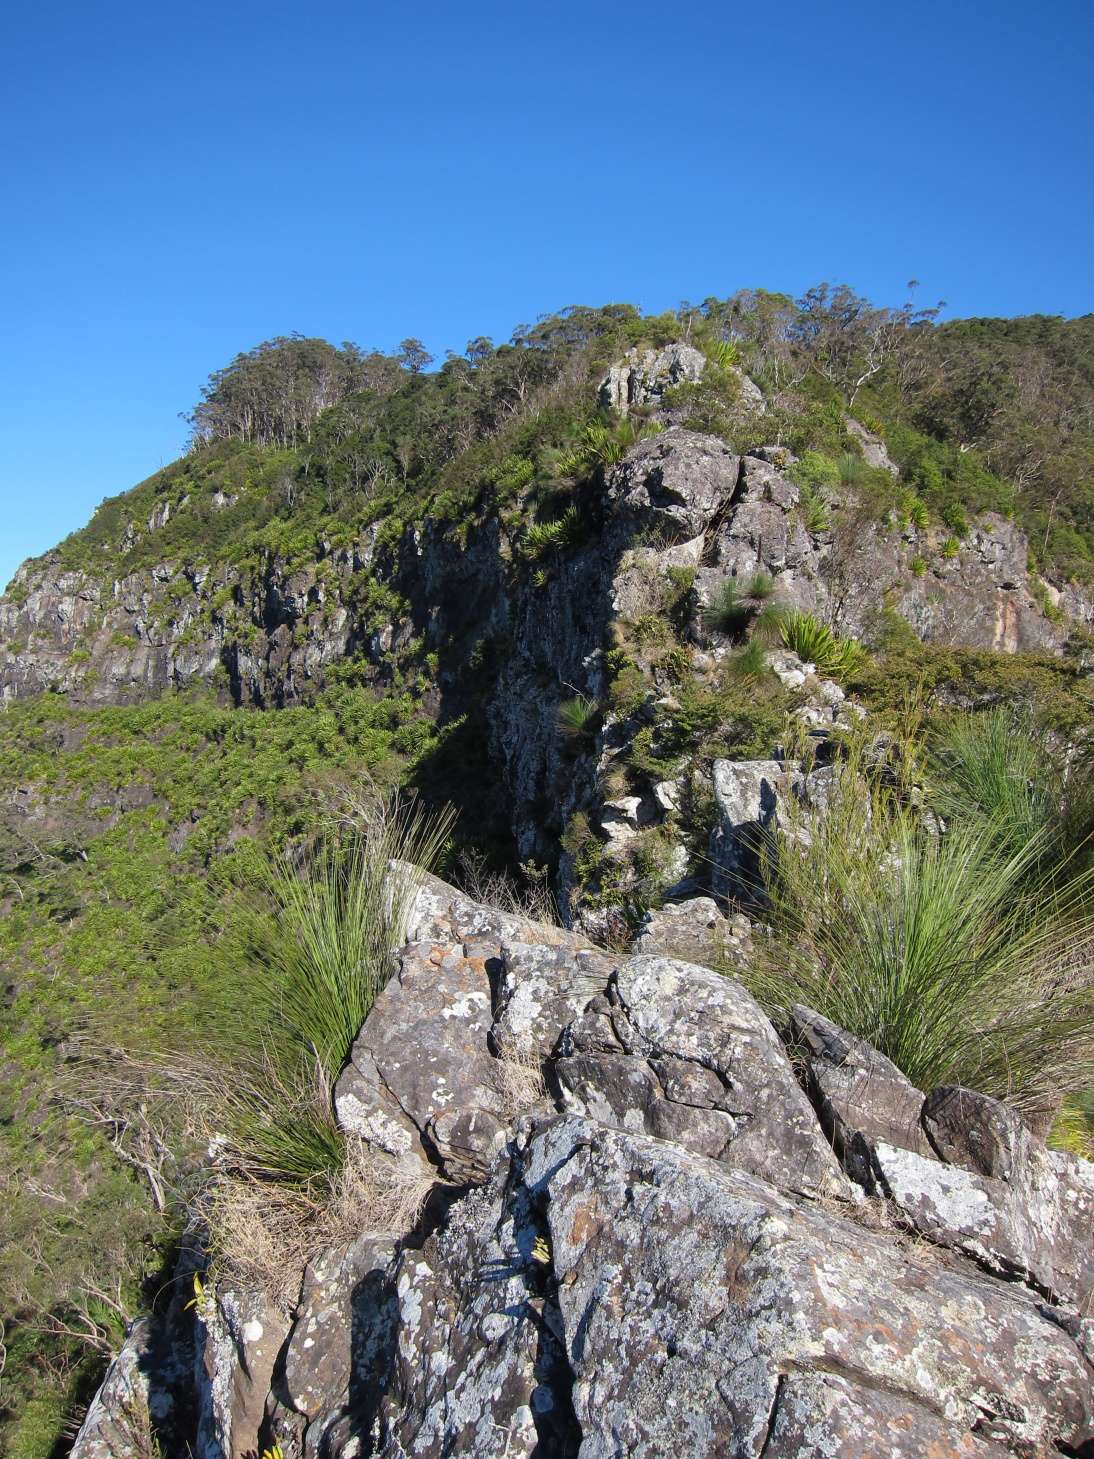
From here the ridge narrowed significantly and become a rocky razorback only a metre or two across and sometimes less. Before long I reached a very narrow section which after inspecting more closely turned out to be the top of Hole in the Wall. I carefully crossed this section and found a way down off the ridge top not too much further on. Hole in the Wall was just that, a picturesque hollowed out section of the ridge with amazing views in all directions.

Razorback ridge looking towards Boar's Head
Looking back the way I'd come. You can see the large crack mentioned above
A particularly narrow section of the ridge
More Ridge
Masses of spear lillies colonising the cliff faces
Hole in the Wall from above

It's a hole in the wall
Laidley Valley through HITW
After taking some photos and having a snack I shuffled off back the way I had come. In the end I had plenty of time to reach the lookout which allowed me time to take it easy on the up and down hill sections. I reached the road by about 11:40 and started heading down it towards the Goomburra camp ground. Half an hour later my ride appeared from around the bend and I was whisked back to civilization.

Self Portrait
Overall this was a great adventure with my favourite bits being the views and rock scrambling on the second day. I’m already planning another trip heading to Mt. Castle in the not too distant future so stay tuned.

Tuesday, 26 April 2011

Gold Coast Hinterland Great Walk

Date: 12 - 14 February 2010

Walkers: Myself, Tom

Photo Album

Walk Description:
This was the second attempt that Tom and I had made at this walk. The first time ended after one day. It poured rain all day and we were soaked through. The final straw was when we discovered that the lid had come loose on Toms water bladder and leaked about 2 - 3L of water all through his clothes, tent and sleeping bag.

Day 1:
Day 1 of the walk involves walking the boarder track from O'reilly's to Binna Burra. This track is well marked and graded. This would be my 4th time walking this track so there wasn't too many surprises. There had been some work along the track to clear some of the lookouts which was good. A few snakes were encountered including one red bellied black which took some convincing to get off the track. This stretch took around 7 hours.
View South from the border track
Red Bellied Black snake on the track
 
Day 2:
Setting off from Binna Burra Day 2 starts along the Ships Stern track and eventually turns onto the Lower Bellbird Circuit. This is one of the best parts of the entire three day walk. Some very picturesque views. The photo to the right shows the view to the East and the path ahead. The photo below is of a beautiful waterfall where we stopped for morning tea.


Eventually the great walk turns off this circuit and heads down off the main plateau. This section of the track follows a fire trail and is very steep and ungraded. This continues for quite a while and is hard on the knees. Eventually the trail crosses a creek and levels out. The track leaves the fire trail at another creek crossing and heads up through some swampy scrub. This section can be fairly overgrown and one section was completely submerged by a pond. We were able to bush bash around this without getting our feet wet while dodging the giant spiders.

Eventually the track meets up with the fencline of the jail and mainly follows this down to the Numinbah Valley where it meets the road. The track then follows the main road into the Numinbah township. This section of the track was horrible. It was completely out in the open and simply followed the side of the road. Was very hot and took alot out of us. An hour or so later we arrived at the Numinbah Cafe. This is where we stopped for lunch and filled up our water. They were nice enough to fill up our water behind the counter at the cafe.

Soon after leaving the cafe the track heads off on some more fire trails.The track heads up and over a ridge and down into the valley next to the main Springbrook Plateau. The track follows some farmland and crosses over quite a large flowing creek. This required getting feet wet. The creek ran next to a cow paddock so we collected water here but only for boiling. The final stint followed the creek upstream for a while before crossing it again and starting the trek up Springbrook. This section followed a road and was ungraded and reasonably steep. At least it felt steep at the end of the days walk.

We were very pleased to see the campsite. It has a toilet block and some very nice grassy campsites with an amazing view out over the Numinbah Valley.
Campsite for day 2

Day 3:
Day 3 started off up hill straight away.The track climbs the Springbrook Plateau with over 900 steps. Despite this being a very tiring climb there was some amazing views out over the valley with a really nice breeze to help cool us off. Eventually the track comes out at Apple Tree Park. There was no potable water here when we went through despite being back in civilisation.

The track then crosses the main road and then continues back down to Little Nerang Creek. We stopped and filled up water at the creek and had a snack. The creek had quite a lot of water in it. Tom as usual skipped across the nearly completely submerged rocks while I blundered my way across using a stick to help keep my balance. The track then follows the creek up to Warringa Pool where it meets the day walk track system.
Small waterfall beside the crossing mentioned above
Despite another steep ascent up to the top of Purling Brook Falls this is one of the other more enjoyable sections of track. The track first stops at the base of the falls where you can walk behind them and get thoroughly drenched. This was awesome after the past 2 days. Eventually it comes out at the top of the falls before continuing on to The Settlement campground.

It wasn't long after we finished lunch when Maree showed up to take us home to a nice shower.
Purling Brook Falls

O'reilly's to Lost World

Date: 20 - 21 March 2010

Walkers: Myself, Tom, Kurt, Craig

Photo Album

Walk Description:
Day 1
After meeting early on Saturday morning at Beaudesert we travelled in convoy to the Lost World Crossing along Kerry Rd. Having sketchy details about where to leave the car it was good to find a fairly obvious spot just before the crossing in a grassy patch. We then took the other car up to O'reilly's via Duck Creek Rd. and were ready to start walking at around 9am.

The first section of the trail was a familiar one following the border track for roughly 5km before turning off on the Albert River circuit to Echo Point. After taking a short break and taking a compass bearing at the Echo Point camp site we headed off the maintained track system on the Stinson Track. The track instantly heads up hill and becomes a lot narrower and overgrown. This makes for much slower progress.


After walking for roughly an hour the track passes near the peak of Mt. Worrendo. We weren't exactly sure where to turn off the Stinson track so in the end headed for the peak of Mt. Worrendo. From here we picked up a track marked with occasional pink ribbons. This track mainly followed the ridge down toward the Lost World Saddle becoming harder to follow and steeper. Eventually we relied mainly on following the terrain and compass bearings.


We arrived at the Lost World Saddle camp site at roughly 4pm. As we are getting used to, the GPS coordinates given by EPA were off by about 100m. The site easily had enough room for our 3 tents and was fairly flat and sheltered by trees all around. Only dramas were the discovery of some fairly giant ants that came out after dark and the rain that fell for most of the night.

First view of the Lost World Plateau through the trees on the way to the saddle
Lost World Saddle Campsite
Giant ants came out to play just as we were preparing for bed
 Day 2
We packed up camp and managed to set off by around 7:45am. Having not found any creeks so far we divided up the remaining water. We were hoping to find water on the plateau near the camp site. The track heading out of the camp was easy to follow and started up hill immediately. The ridge quickly became very narrow and exposed with large sheer drops on both sides. The way up involved a lot of very steep rock scrambling. Definitely tested your stomach for heights.
Very narrow ridge leading up to the Lost World

Progress was very slow all morning and once we had reached the plateau the track was virtually non-existant. We eventually reached what looked like the highest point of The Lost World at about 11am. This was marked by a pile of rocks and there was a big enough clearing to set up a few tents here if need be.
We set our sites on the opposite side of the plateau where we hoped would be the way down. The route we took was fairly direct and was very overgrown and involved alot of bush bashing. Eventually we decided to head for the Northern cliff face to see if this was more open. Indeed it was and we eventually found some sort of track through the long grass. This eventually led to the other camp site and the small creek. There wasn't much water in it but it was flowing. Everyone filled up using a filter and steri pen just in case.

Western Spur
After a short up hill section we ended up at the western spur of The Lost World. Not being able to find much information about how to descend this side meant we walked out to the tip of the spur and began investigating how to get down this very rocky section. Eventually deciding this wasn't the way down we started heading back off the very narrow spur.
Track we found down the Western side


On the way back we spotted what looked like a track on the northern, not quite as cliff like, side. After further investigation we found a definite track and some pink ribbons. This track skirted around the tops of cliffs and zigg-zagged down the steep slope until it ended up at the bottom of the spur.

From this point we mainly followed the top of the ridge down until we hit a fence line. There were a few more rocky outcrops along the way which required detouring off the ridgeline slightly to get around them. Mostly on the northern side. Once reaching the fence line we followed this until we got to the remains of a road and followed this down to the paddocks below.

Razorback ridge leading back down to the farmland below
Posing where we left the car. Lost World in the background