Tuesday 13 December 2011

Binna Burra: Lower Belbird Circuit

Looking across to Ships Stern
Date: 28 Nov 2011


After having our Girraween trip cut short by rain the week before we wanted to get out for another walk while we were still on holidays. Trying to avoid the heat somewhat we headed for higher altitude and shady rainforest at Binna Burra. We decided on the Lower Belbird Circuit which I remembered as a highlight of the Gold Coast Hinterland Great Walk.

Monday 28 November 2011

Girraween Again

Sunset behind Mt. Norman
Date: 21 - 22 Nov 2011

Maree and I have started a bit of a tradition of taking holidays during this week over the last few years and we weren't going to skip this year. After our previous trip to the park in September we decided that we'd like to go back and explore it in further detail without the limitations of a single weekend. The highlight of the trip was definitely an overnight walk taking in Mt. Norman and Twin Peaks.

Tuesday 4 October 2011

Warbonnet Blackbird

I have been curious about camping with hammocks for a couple of years. Their supporters claim many advantages over more conventional tent camping methods including:
  • More comfortable for sleeping
  • Dual use as a chair
  • Lighter weight
  • Quicker to set up
  • Easier to find a spot to set up camp
A recent flurry of interested on the Bushwalking Australia Forums prompted me to have another look and after some (fairly brief for my standards) research I ordered a Warbonnet Blackbird Hammock in double layer 1.1oz/yard ripstop nylon. I ordered it with the adjustable webbing suspension and picked up a pair of Petzl Ange biners to get it up and running. This hammock comes with built in bug netting and a structural ridge line to aid in set up. I also ordered a ZPacks Cuben Fibre Hammock Tarp which is still on its way.

I received it at the start of last week and was burning to get out and give it a test run somewhere for the rest of it. My back yard is lacking any strong enough supports to do this easily. The picnic area at the base of Flinders Peak provided the perfect spot to do this and I had it up in no time (copping a few wierd looks from onlookers in the process). I'm sure there is plenty of room for tweaking, but getting it up and hanging was very easy.

Hanging in a creek bed

Flinders Peak

Flinders Peak Pano
View towards the Great Dividing Range
Flower at the peak
View to the North-West
Let me know if you would like any further details on this walk and I will convey them via email.

Sunday 11 September 2011

Cold, Windy but Beautiful at Girraween


Date: 10 - 11 Sep 2011

Day 1:
Main Range at Sunrise from the Highway
Maree and I decided to get away for the weekend to Girraween N.P. near Stanthorpe. We got away to an early start on the Saturday morning which meant we got to the camp site by about 8:30 in the morning. There was a moderate number of people camping in both the Bald Rock Creek and Castle Rock Campsites and we chose the latter as we hoped there would be more exposure to the sun.

By 10:00 we were set up and ready to go. The plan for the day was to head out to The Sphinx and Turtle Rock to investigate the climbing opportunities there. The track heads off from the Southern End of the campsite and is also the starting point for the Mt. Norman and Castle Rock walks. The walking was extremely pleasant with the clouds clearing to a beautiful day and the good quality track providing easy walking up a gradual incline for most of the way. The only downside was the wind which was gusting to around 30 to 40KM/H.

Tuesday 30 August 2011

McHale Goodness

This has been a long time coming. I started out on a quest for a new pack late last year after going through a few that I wasn't completely happy with. Eventually, after trying on a number of packs and doing extensive research on the internet I decided to contact Dan McHale in the USA to get a custom pack made.

I initially decided on a Little Big Pack 36 as the base for the pack. I wanted the volume to start at around 40L and extend up from there with various options to maybe 50L - 55L. I hoped for it to be useful for overnighters without having too much extra bulk but also be capable of carrying enough food and gear for possible climbing adventures and extended walks in the future. I made the decision from Dan's advice to increase the diameter to a 37 inch and I'm glad that I did because the pack that I've ended up with is spot on in this regard. I see myself using it for all but the most basic of fast overnighters.

Material wise I went all out. I figured that this sort of opportunity dosn't come along too often and I want something that will last a long time to come. Therefore almost the entire pack and accessories are constructed with 100% woven dyneema. The only exceptions being some select sections of the harness, the daisy chains and the water bladder pocket. The latter being constructed of cuben fiber.

The whole process from first contact took roughly 6 months. I had the demo pack for a couple of these months in the middle. This is a long time and I'd say this could be attributed to the materials and customisation that I wanted, the slow speed of email communications and that Dan is just very busy.

As far as the options go I wanted the pack to be very configurable. This has probably come at the cost of slightly increased weight but I think it was worth it. All options and loops can be removed from the pack to bring it down to its most basic form with a roll top closure bag with an awesome harness. The options that can be added are:
  • Front pocket with a draw string and flap closure. This is a sizeable compartment with its own compression straps and attaches to the front daisy chains using an adjustable shock cord system. This means that you can use the space behind it to store large items aswell.
  • 2-Layer Summit flap. This is a simple lid with a small zippered compartment in the top.
  • 2 x Standard hip belt pockets. Good sized hip belt pockets with zippered closure. Very handy.
  • "Triple Threat" pocket. This is the bladder pouch that can either be hung inside the pack, attached to the underside of the summit flap or attached to the side of the pack.
  • Removable ice axe/walking stick upper and lower loops.
  • Fully removable side compression straps
  • Plug & Go Bayonet frame extension system. This includes the bypass "load lifter" straps. This system allows the frame to be extended, significantly increasing the capacity and load carrying capability of the pack.
The weight of the pack has come out slightly higher than I was expecting. In its most basic form it is roughly 1.45kg. With all options added it gets up to around 2.05kg.

Edit: I've played around with it a bit more and am even more impressed with its configurability. It can be stripped down even more than my first attempts and still be usable. With the frame, back pad and hip belts removed the weight comes down to around 850g. In this configuration it is similar in features and not too much heavier than my Golite Peak but still larger in capacity, tougher and more comfortable.

Can't wait to get out and give it a go. Here are some pictures.

Stripped down side view

Stripped down using roll top closure
Stripped down harness side

P & G Bayonets inserted, bypass straps attached (in red)

All accessories attached


Sunday 7 August 2011

Sylvesters Lookout to Mt. Castle

Campsite on Mt. Castle
Date: 1 August - 2 August 2011

Walkers: Tom and Myself

Notes:
Day 1
Well I promised in my previous post from Hole in the Wall that I'd be back to this area soon. Wasn't sure it would be this soon, but Tom was heading off overseas this weekend for 6 months so I thought this would be a great place to take him as a fairwell.

Using my experiences from the last trip I decided to concentrate on the best bits from that walk and add in the trip to Mt. Castle. This walk was also recommended to me by some posters from the Bushwalking Australia Forums and avoids any access issues. The only downside being that the car journey in to Goomburra and on to Sylvesters Lookout takes a bit longer.

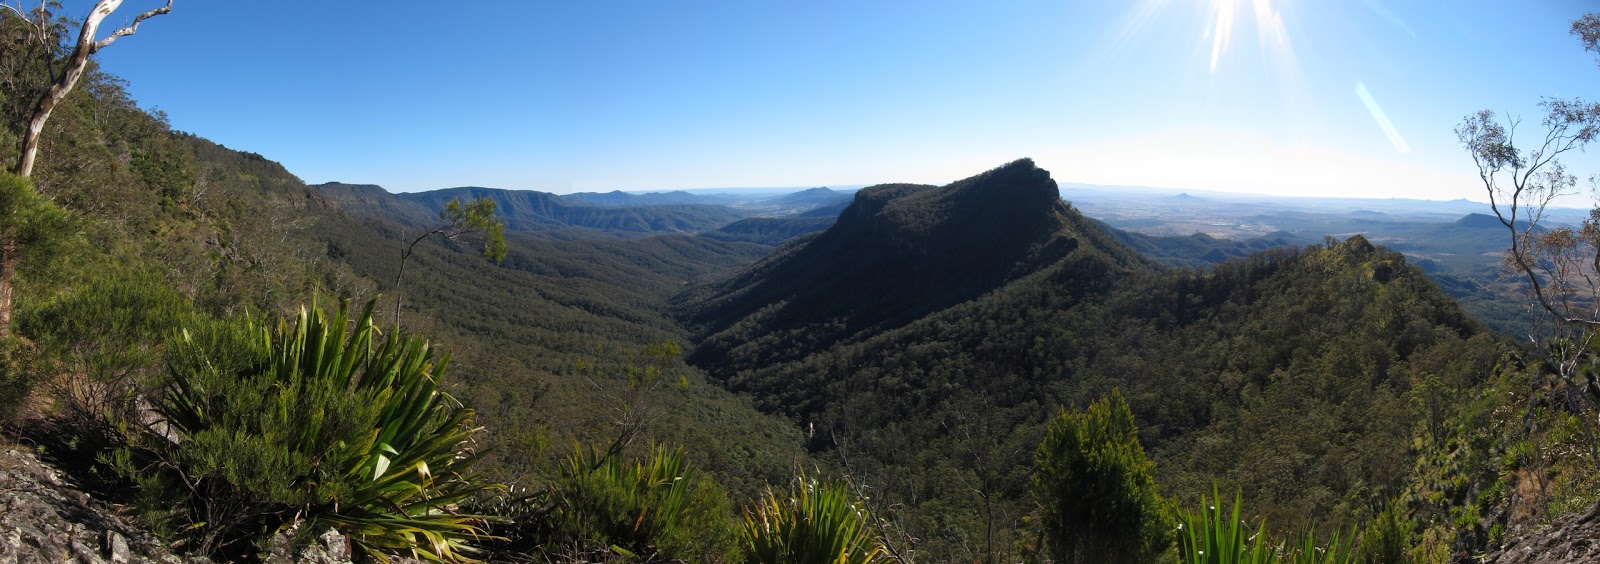
We arrived at the lookout by about 10:30 in the morning and after doing a bit of repacking got on the trail by about 11. The steep section after Sylvesters lookout wasn't nearly as bad as I remembered. Probably due to it being at the start of the walk rather than after 8 hours of bush bashing. We once again detoured to the old Sylvesters Lookout, however this time ventured out to the tip of the rocky spur through a clump of massive spear lillies and was rewarded with a more expansive and unobstructed view.
View from Old Sylvesters Lookout
See the notes from the previous walk for more details about the track up till Laidly Creek Falls Campsite and on to Hole in the Wall. We took the direct ridge route to HITW again and having a second person this time meant we were able to get some action shots.
First Downclimb Section
Negotiating the Ledge above HITW

We reached HITW in around 2 hours and stopped there to enjoy the view and to eat lunch in the shade. The temperatures were surprisingly hot and reached 30 degrees in the middle of the day. From there we decided to follow the ridgeline as much as possible and between HITW and Boar's Head there was only one section where we had to deviate from the ridge line.
Ridge After HITW
Tricky Downclimb Before Boar's Head
Before long we arrived at the minor peak of Boar's Head where there were great views in all directions. From this point the track headed downhill again but still following the ridge which by this stage was wider and even had room for numerous cow pats from adventurous bovines making the trek from the paddocks below. I was once again amazed at the number of spear lillies that cover the cliffs in this area, some of which even had some huge flower stems seen below.
Spear Lilly Flower
Tom Vs Spear Lilly
The ridge soon narrowed to a razorback where we attempted to stick to the ridgeline. Once again there was only a single section that we had to bypass to the right because of a large step up in the ridge before we reached the base of the cliffs that line Mt. Castle. From here we traversed North under the cliffs until we reached a break where it was possible to start heading up-hill towards the peak. This was a steep grassy slope broken up by a couple more rock scrambles but before long we had reached the ridge and then the peak.

The campsite was located directly on the main peak of Mt. Castle and was padded with grass and broken up by some small gums and grass trees. It had an amazing view to the East however, care was taken not to venture too far in this direction because of the size and sheerness of the cliffs here.
Mt. Castle Campsite
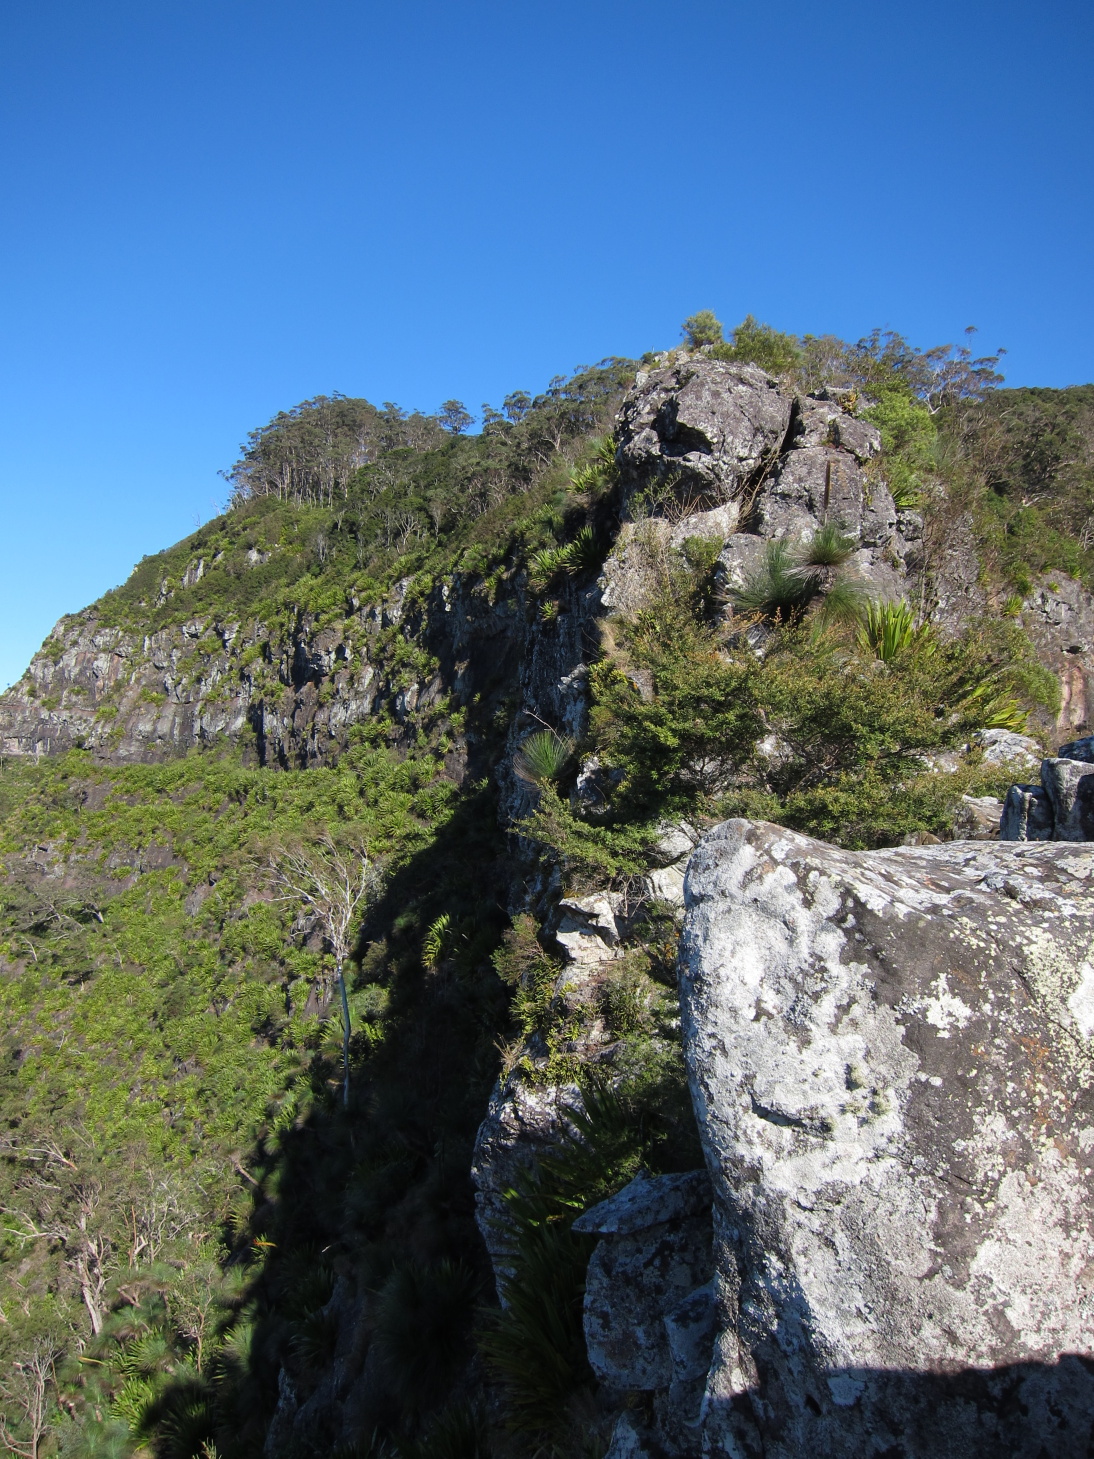
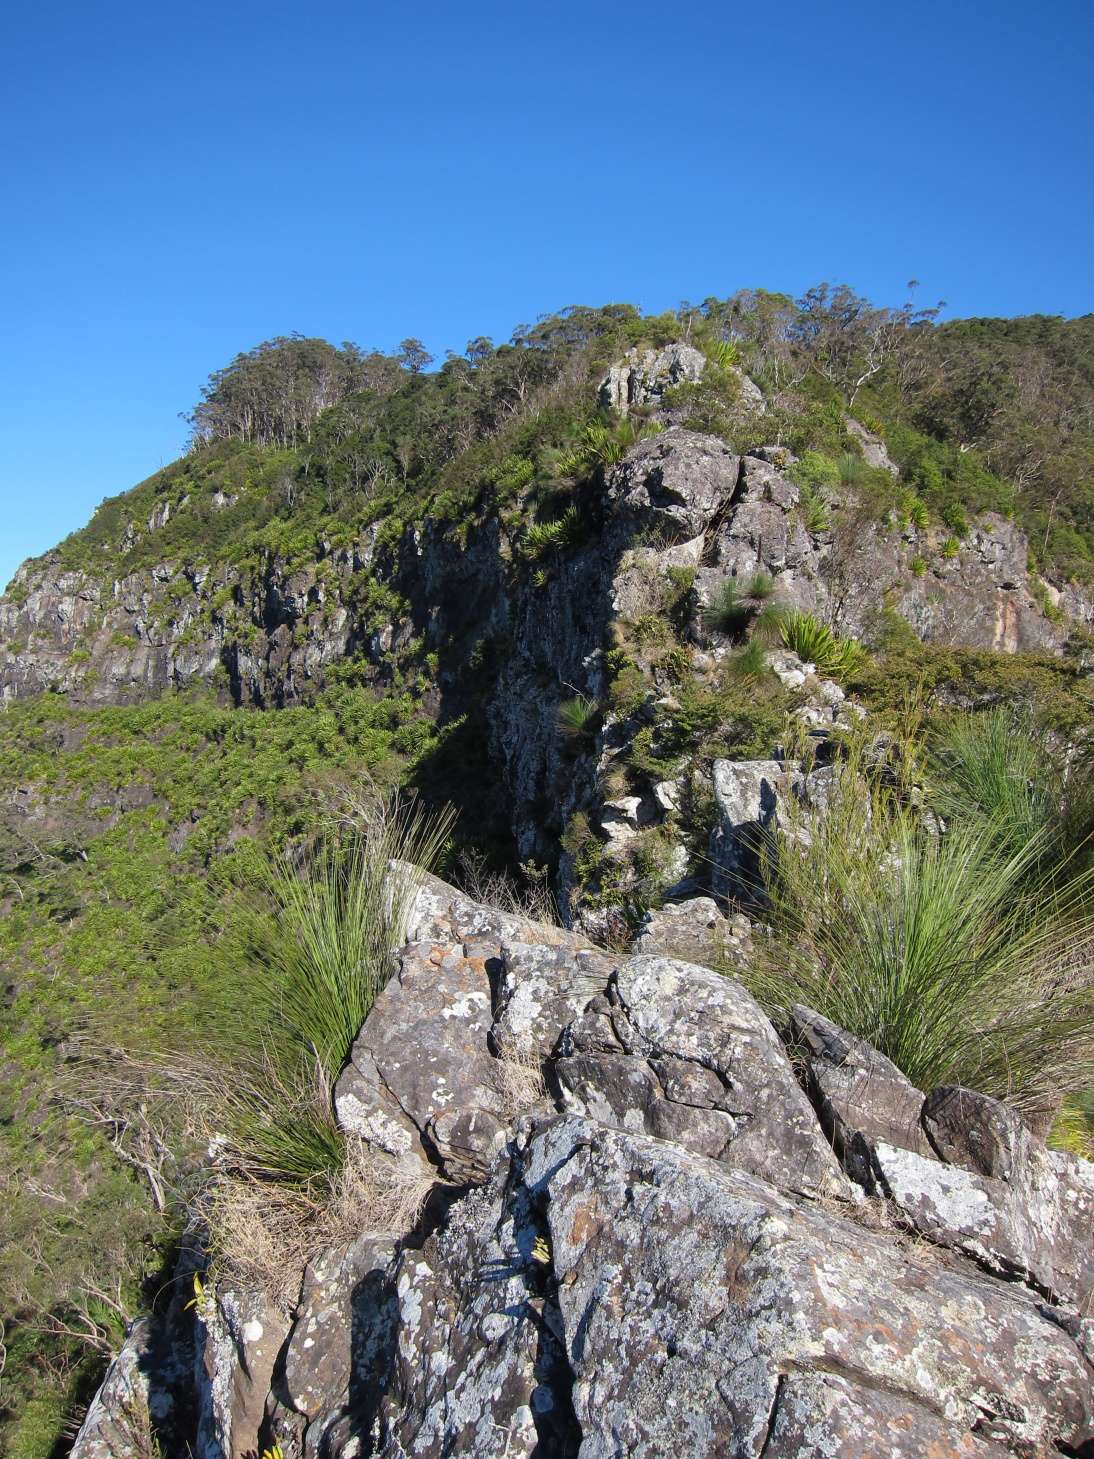
After setting up camp we went for a wander down the ridge to the South of the campsite towards the cliffs that we had reached the base of previously. The ridge here extended out to a narrow pinnacle with amazing views back along the Eastern face of Mt. Castle. Great care needed to be taken along this section though as the drops on either side were significant.
Looking Along the Southern Ridge at Sunset
Tom En Route to the Pinnacle
Myself Negotiating the Narrowest Section of the Ridge
View Towards Mt. Castle from the Pinnacle
Overnight we were terrorised by some small critter and after apparently not learning from our Conondale walk that small critters enjoy nibbling on silicone we awoke to Tom's Sea to Summit collapsable bowl and cup completely torn to shreds and my water bladder drink tube with a hole through it. These annoyances were far outweighed however by the views we got to the East with the early morning fog sitting in the valleys below.
View to the East from the Campsite
View Towards Mt. Edwards with Fog
View North-East from the Campsite
Day 2
We were soon packed up and back on our way. We decided to follow the track notes and take what we thought would be a more gradual route down by heading North to the Mt. Castle saddle then skirting back around. In the end this route was harder to follow and if you weren't careful you could easily end up lower on the mountain than intended. In hindsight we should have just gone back the way we had come up.

From there we back tracked along our route to HITW where we once again took advantage of the shade. We then decided to take the waterfall route back to the Laidley Ck Campsite for a bit of a change. This was definitely worth a look with the large cliffs leading to the waterfall crossing. There was only a trickle of water here and we were careful about where we walked on the slippery rocks. Although, there was a large enough shelf for this to not be too dangerous.
Cliffs leading up to Laidly Ck. Falls
The scramble back up to the campsite was reasonably steep but easy to follow. From here we re-traced our route back to the carpark. One highlight along this section was spotting a massive wedge-tailed eagle soaring overhead. Overall the distance travelled was at the shorter end of the scale but the views and scrambling make this a very memorable walk.

Tuesday 2 August 2011

GPS Tracks

Just a quick note. I have GPS track files for all walks completed after October 2010. I haven't looked too much into the best way to host the files but if anyone is after a GPX file for a particular walk just let me know and I can email it to you.

Edit: From Tony's advice I've started uploading them to OpenStreetMap. Here is the link to my collection so far.

Sunday 17 July 2011

Gear Mini Reviews

Here’s a few of my thoughts on some new or semi-new pieces of gear that I used on my latest trip.

I picked up this single person pyramid style shelter second hand on the bushwalking forums and this was my first outing with it. The shelter uses a single walking pole to support it and uses 6 pegs to hold it down. It is made of siliconised nylon with a no-see-um shaped perimeter net that tucks under the ground sheet to provide some bug protection. One advantage of a floorless shelter is its flexibility of set up, allowing you to pitch it close to the ground in bad weather and raised higher when more ventilation is needed. On this trip I was using 4 Vargo Titanium shephards hook pegs and 2 Easton Aluminium ones for the front and back points. The camp site was fairly well protected so winds weren’t much of a problem. There were a few gusts that came through but the shelter never seemed unstable.

Bugs and rain also weren’t a problem on this trip so unfortunately (or not) I can’t comment on these aspects. I was pleased with the amount of floor space available and I was able to really spread everything out inside the shelter. There was also enough headspace to sit up at the apex comfortably. My only gripe was with the amount of head and foot space available while I lay down. I’m 185cm tall, was using a Thermarest Neo Air mattress and my head only just cleared the roof. The sleeping bag at my foot end was brushing the roof as well, which wasn’t a problem in this case without any sign of condensation. However, if it was a wet or humid night this could have transferred a significant amount of moisture to the sleeping bag. Not good for down. In the future I will experiment with pitching it even higher to try and increase this room.

SMD - Wild Oasis
I’ve been using this frameless 36L pack as a day pack for quite some time but have only tried to use it overnight once before on our ill-fated Albert River Circuit walk earlier in the year. This time my total load was around 7.5KG and I was actually very impressed with the way the pack carried. I have added some better hip belts from a Backpacking Light pack which are much more comfortable than the ones the pack came with despite being a bit heavier. The key is definitely to try and pack out the whole pack so that it is fairly rigid and doesn’t slump too much. I have also found that using the provided water bladder pocket inside the pack makes it uncomfortable to carry as it creates a lump beside the back. I just sit the water on top of everything. I’m still annoyed with the lack of throat material around the top but this wasn’t so much of an issue this trip.

I also added a ZPacks shoulder pocket which is really handy to put the GPS receiver and weather meter.

Golite - Peak
Backpacking Light – Cocoon Pullover
I bought this jacket earlier in the year from BPL while they were having the gamblers sale and have been very happy with it overall. Weight for warmth it has been very impressive. I got the Large size and it weighs around 260 grams. Having the hood also means I don’t need an extra beanie and blocks more wind around the neck as well. The thumb holes around the sleeves are good to maintain no gaps between the jacket and gloves. The only thing that has annoyed me about the pullover is the elastic around the waist. It is too tight and because of the length of the parka it tends to ride up exposing fleshy bits underneath.

Favourite 3 Pieces of Gear from my latest trip
  • Innov8 Terroc 330 trail shoes: Really light, really comfy, great grip on both mud and rock.
  • Hip belt and shoulder strap pockets: I can’t imagine a world before these easy to access pockets now.
  • Merino long sleeve top: Can’t believe I’ve taken so long to get on the merino bandwagon. The amount that it doesn’t stink is amazing.

Thursday 14 July 2011

Cunningham's Gap to Hole in the Wall

Laidley Valley & Mt. Castle
Date: 9 July - 10 July 2011

Walkers: Myself

Notes:
Day 1 
I wanted to get off track for a change after not having done anything like this since our Lost World walk last year. So after getting ideas from my trusty Take a Walk book I decided on Cunningham’s Gap on the Main Range as my starting point. I would follow the range North as far as I could in a day and at that stage the idea was to head back the way I’d come. As usual though, things didn’t all go according to plan.

The forecast for the weekend was COLD. BOM was predicting negative temperatures for Ipswich and that is what we awoke to on Saturday morning. The temperature gauge hanging from the car read just above -4 when I wiped the ice off it at 5AM. We set off soon after and after watching the sun rise on our way we arrived at Aratula for breakfast just after 6. Another 45 minutes and we were at the car park on top of the range and I managed to get going just before 7.

Sunrise over the Moogerah Peaks
The first section of the route was via the Mt. Cordeau and Bare Rock marked track and I covered this first 6KM within an hour and a half. From this point the pace slowed significantly as the track all but disappeared. The track notes were fairly vague and I found the small details they did give not very useful as it was hard to gauge distance covered or to find some of the landmarks mentioned.

Is there a track in there?
Climbing Vine
Large trees and crows nests were the highlight from this section
My general advice would be to keep track of the edge of the Eastern escarpment and not to stray too far from it in most cases. Sometimes foot pads could be found on the narrower ridges which was a godsend. However, as soon as you found one and got up some speed there would be a tree fall and it would disappear amongst the vines and foliage brought down from the tops.

The one feature that was hard to miss was the rocky spring fed creek. Despite earlier creek’s being dry this one still had a reasonable trickle so I filled up an extra litre of water here. There weren’t any obvious spots for lunch and in the end I left it too late to stop; I felt the effects of this throughout the afternoon. 

After slogging up the final two or three peaks of the ridge I eventually made it to Sylvesters lookout by about 3 in the afternoon. I collapsed here for about half an hour before convincing myself to get up otherwise I wasn’t going to make it to camp before dark. The track leading to Laidley Ck. Falls and Hole in the Wall left from just before the lookout platform and was a much more defined foot pad than the previous section.

After descending slightly to a rocky gully the track rose steeply until it came to an obvious junction where an off shoot headed off to the right to the old Sylvesters Lookout. Despite the track notes describing the views as poor I thought it was well worth the small detour. The views back down the range were spectacular.


Once I rejoined the main track there was some more uphill before finally reaching the top of the ridge and subsequently descending all the way down the other side. This section travelled through some less dense eucalypt forest with shoulder high ferns often hiding the track in front of me. Once again my advice here is to keep closer to the escarpment than not. There was a large tree fall that blocked what looked like it used to be the track heading more directly down the ridge. After one more knee crushing muddy down-hill section I finally reached the camp site just before 5 and just in time to set up camp before dark.

Large gum trees surviving on an exposed ridge
This section of the ridge was exposed to the strong Westerly
Day 2
My campsite at Laidley Ck. Falls
Overnight, the temperature didn’t reach the minimum’s that had been predicted by the bureau. Instead it only reached about 4 degrees. The wind did change direction at one point but overall the campsite was well protected from the 50km/h Westerly’s I’d experienced the day before (yes this was my first trip using my little Brunton weather station).

After my experiences of day 1 I decided that if possible I’d much rather not do the section from Bare Rock to Sylvesters lookout again. Luckily there was plenty of phone reception and I was able to organize my pickup to detour to Goomburra Valley instead of the gap and I would try to be back at the lookout by around 1PM.

I still hoped to get out to Hole in the Wall before heading back to the lookout so I followed the notes advice and headed North-West from the campsite on one of the obvious foot pads heading out of the campsite. I soon found Laidley Creek which had a very small trickle of water flowing. There were numerous foot pads in this area and it soon became quite confusing which one was the correct one. I eventually ended up at the cliff face at the top of the falls looking out towards the valley and Mt. Castle. It was obvious that this wasn’t the route described in the notes and I was running out of time so decided to just head for the main ridge and see what the not-so-recommended direct route was like.

I reached the tip of the main ridge quickly where I was greeted with amazing views down the Laidley Valley, across to Mt. Castle, out over the Moogerah Peaks and back along the Main Range. The track continued to the edge of a drop off which after closer inspection proved to be the way down. There was an indentation in the small cliff line with plenty of foot and hand holds. An obvious foot pad then continued through a small patch of trees before reaching another small drop off negotiated by down climbing a wide crack.

View back down the range and towards Moogerah Peaks & Mt. Barney
From here the ridge narrowed significantly and become a rocky razorback only a metre or two across and sometimes less. Before long I reached a very narrow section which after inspecting more closely turned out to be the top of Hole in the Wall. I carefully crossed this section and found a way down off the ridge top not too much further on. Hole in the Wall was just that, a picturesque hollowed out section of the ridge with amazing views in all directions.

Razorback ridge looking towards Boar's Head
Looking back the way I'd come. You can see the large crack mentioned above
A particularly narrow section of the ridge
More Ridge
Masses of spear lillies colonising the cliff faces
Hole in the Wall from above

It's a hole in the wall
Laidley Valley through HITW
After taking some photos and having a snack I shuffled off back the way I had come. In the end I had plenty of time to reach the lookout which allowed me time to take it easy on the up and down hill sections. I reached the road by about 11:40 and started heading down it towards the Goomburra camp ground. Half an hour later my ride appeared from around the bend and I was whisked back to civilization.

Self Portrait
Overall this was a great adventure with my favourite bits being the views and rock scrambling on the second day. I’m already planning another trip heading to Mt. Castle in the not too distant future so stay tuned.